The floating search bar is a new function in Windows 10 designed to make the user experience much more usable for users. The design is inspired by the spotlight – a feature from Mac OS. By using the floating search bar, you can look for your favorite apps, in apps data, files, and other documents. It’s a great way to explore and find data on your Windows 10 PC.
Although there is a dedicated search option for windows. However, it’s not very accessible as you manually have to press the search bar and type stuff. The new floating window search bar in windows 10 is much more advanced and robust. It can look for files and in between files as well. Which makes it an ideal searching option for students, businessman, and average PC users.

Steps To Enable Floating Search Bar in Windows 10:-
Since the new Floating search bar option is not available for the majority of Windows 10 users, so why not enable and to use it. It is very easy to enable this new feature. Here are detailed steps to enable the feature on your Windows 10 machine.
Note: This feature for the floating search bar will only work for Windows 10 1809 and above. So in case you have installed a previous version of windows, please update!
To enable the immersive search option, you have to edit the registry file of your PC.
1.) Go to Run (Press Ctrl + R) and type “Regedit.exe” to open the registry editor.

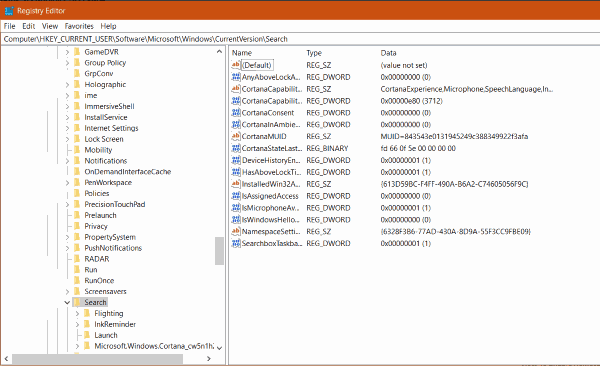
2.) Now navigate to the following key:
Computer\HKEY_CURRENT_USER\Software\Microsoft\Windows\CurrentVersion\Search
3.) In the right pane of windows, you have to create a new DWORD 32-bit value. Name this new entry as “ImmersiveSearch” there.
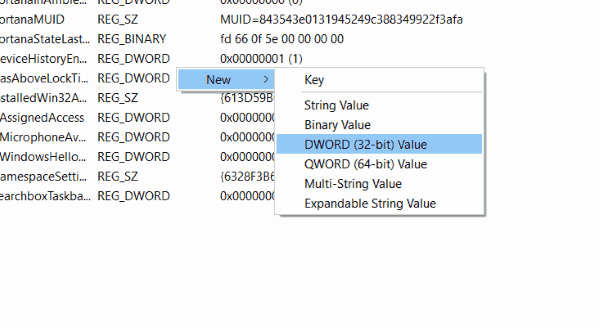
4.) After creating the entry, you have to change the value to “1” to enable the floating search bar option.
And voila! You can now enjoy the new immersive floating search option.
Steps To Disable Immersive Search Bar:-
The new immersive search bar is great. But there are chances that many people won’t like it much. Since it stays on top of your screen space. So it might cause problems for some users. So here is a simple way to disable it.
1.) Open registry editor and navigate to:
Computer\HKEY_CURRENT_USER\Software\Microsoft\Windows\CurrentVersion\Search
2.) Choose the DWORD 32bit entry which you created earlier.
3.) Change the value of ImmersiveSearch to 0. This will disable the floating search bar on your PC.
Note: You can change the Windows search settings by going to Windows Settings –> Search
Normally, the new immersive search bar feature is enabled or disabled instantly the moment you change the registry files. In case it doesn’t work, try restarting your PC. And if it still doesn’t work for you, then make sure you have the latest windows 10 installed on your system.
From Editor’s Desk
- KineMaster for PC and Mac – Windows 7, 8, 10
- How To Open Torrent Files on Windows 10 & Mac?
- Best PC Optimizer Software For Windows 10, 8, 7
- Best Rainmeter Skins for Windows 10 PC
- Best Amazing Tools To Customize Your Windows 10
