Have you ever considered writing your text in a way that improves its readability and makes it clear and eye-catching? Writing your content, using Strikethrough text, and correctly formatting your text play important roles.
It changes not only the appearance of your text but also increases its efficiency. It allows your text to be understood faster and more adequately. Most importantly, it lets you mark the important points so readers won’t miss them.
Nowadays, it is essential for people writing online content to have basic formatting skills. These skills help them increase their value in the market if their content is given a proper foundation that helps readers understand it quickly. People will eventually start liking the content of those writers. Strikethrough is a formatting technique people use to hide or cancel written data.
In today’s world, where everything is becoming digital and Gmail is the most used path to share information, it is essential to format email messages properly so they can be delivered to the recipients appropriately.
Also Read- How to Change Your Display Name on Gmail Account
How To Strikethrough Text in Gmail
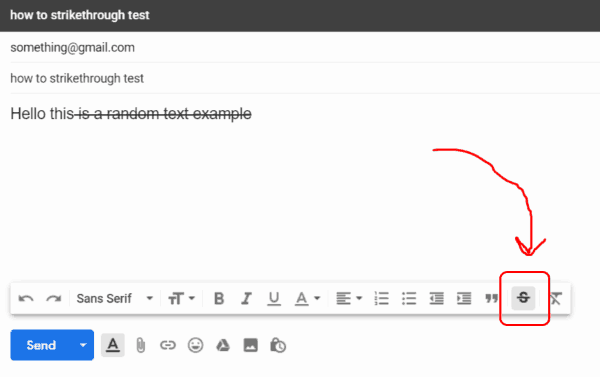
The strikethrough text Gmail is one of the formatting options that looks like ( the strikethrough text Gmail ) . It is considered an essential option that might be used to grasp something. It indicates that the text must not be considered, but is still mentioned in the content if you need it or let the readers know that you choose to replace it with something different.
Earlier, Gmail didn’t have a reliable option for strikethrough. However, now there’s a simple toggle button. So, to strikethrough your text in Gmail, follow the steps below:
- First, log in to your Gmail account.
- Click on compose mail and fill in the necessary details
- Highlight the text that you wish to strike through
- Look at the bottom right of the email composer; You will see a strikethrough button .
- Click on the button, and the test will become strikethrough.
You can also use the strikethrough option with the key combination (Alt-Shift-5)
NOTE: The Strikethrough text formatting will not work if you have not enabled the Rich text option in your email. To enable this option, follow the steps below:
- Open your Gmail account and click on Compose to write a new email.
- Click on the three at the bottom to pop up a menu.
- Check if the Plain Text Mode is ticked. If yes, click once again to untick it.
Also Read- Duolingo Alternatives
Highlight Text in Gmail
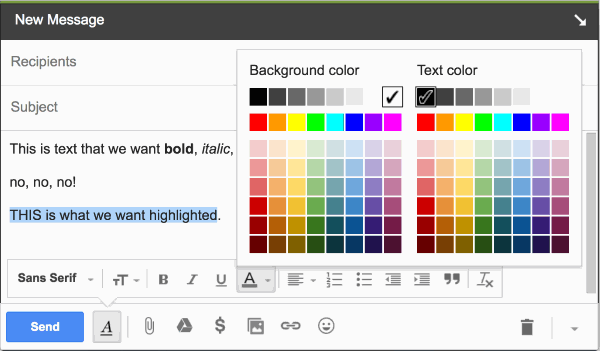
The highlighting in Gmail is generally not used outside an office environment. But it is still possible to do so if you want to. To highlight text in Gmail, follow these steps:
- First, open your Gmail and click compose to write a new mail.
- Now, type your text and select the part you want to highlight.
- Next, select the underlined “A” option next to the “Send” button in the compose window.
- Again, select the underlined “A” option in the text options pop-up bar.
- Lastly, select the background color from the left color pickup tool.
Bold Text in Gmail
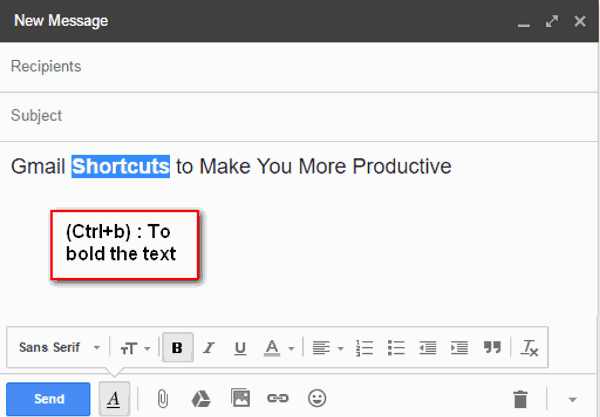
Bold text in your mail helps your content stand out. It draws the readers’ attention and helps them understand the meaning quickly. To make your text bold, follow the steps below:
- First, open your Gmail and click on Compose.
- Select the underlined “a” option next to the “send” button.
- Select the text you want to bold and select the “b” option on the pop-up bar.
NOTE: The keyboard shortcut to make your text bold is “Ctrl + B.”
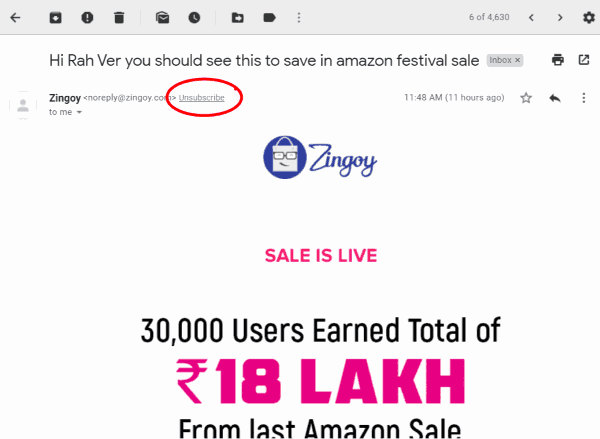
- First, open your Gmail dashboard.
- Now select the mail you want to unsubscribe.
- Select the grey “unsubscribe” link next to the sender’s name.
- You will be done by clicking the “unsubscribe” button on the pop-up.
Congratulations, now you won’t get such emails in your email box.
